The process
Our kitchen rebuild process


Old kitchen
I spent hours looking at photos on Houzz, Pinterest, and reading articles on what is in style and what is over done.....what’s important up in today’s kitchens. I didn’t always pay attention to fads while designing but I wanted to know if I was choosing a outdated element for resale value.
Firstly, the area is about 13’ wide and 15’ long exiting through an old sliding door to the patio and the back yard we love. We got the door replaced by Lowe’s with French doors that open out so they don’t interfere with the kitchen space. We also added rolling screens. We will attack the new deck later. We have 24” eaves to protect the doors when open.

The plan

New doors, screen closed on the right side
The cabinet arrangement happened pretty easily, fitting it into the space we had. Wanting to keep the island we built 7 years ago, the plan became a wide galley style. But it was time to decide on a cabinet style. Uniqueness was an important factor but balance another. It needed to look like our kind of space but still consider the old brick ranch house style and location in the mountains. When folks are on the older side, homes should be kept sellable just in case. I love very modern styles but they wouldn’t work here.
Color was a priority but Chuck, the wood worker, really wanted the wood grain to show. So I thought colored stain and choose a wood with strong grain patterns like ash. We had used it in the bathroom from last years project. That stain was a bit too dark for my bright new kitchen. Yeah, colored stained wood isn’t trendy but it’s something we like.

Now we had a general style and arrangement of cabinets we needed some work plans. We also needed plywood for base and wall cabinets. I joined a professional cabinet makers group on Facebook and those folks were really helpful in answering my questions on the best woods and building process. Seeing their professional work was inspirational.
Plywood is actually the most reliable wood for the frames. We chose Columbia high quality plywood, finished with a hard clear acrylic on both sides. Great to clean up. We knew we didn’t want MDF although most commercial cabinets are made from it. Also learning from the cabinet makers we used 1/2” plywood for the wall cabinets. It doesn’t need to be bigger and it keeps the weight down.
I drew up the plans the old fashioned way with pencils, ink and paper. Just seemed natural. I’ve done drafting and designed several kitchens and we built 2 of them ourselves along with many other cabinets. I felt comfortable that if I can draw it, we can build it! Computer programs work fine but there’s something about paper that feels comfortable.

The bar area

The stove side on the south

The sink side on the north
Before we tore into the wood, we got a building permit. I had to study hard on the local codes to pass the electrical test so we could install the 5 new electrical circuits, all the new outlets, lighting and switches. Ended up correcting several mistakes from the previous owner. It was a challenge but there was money to be saved. Today’s codes say certain appliances need their own dedicated circuits. We also had gas installed for the range....but I wasn’t ready to undertake that job!

Electrical detail!
As far as the design of the cabinets go, I wanted a lot of interest defining different work areas with some level of distinction such as color, up on feet, use of windowed doors, counter material, view to the outside, etc. For example, in the appliance/prep area, designing it to be suggestive of an old style kitchen cabinet. Wasn’t interested in the usual rows of matching doors and drawers of commercial units. I wanted the areas to jump around with a bit in interest but still function as a unit.
Stained blue worked for the base units and fridge enclosure and a creamy white stain on the wall units which would have textured glass in the doors. It’s important to balance the level of interest between the two sides so one wasn’t busier than the other. We had used slats sort of like shiplap for door inserts before and thought it was different enough to be interesting for the base doors. It took Chuck a while to cut that many thin slats and it took longer for me to finish but they look a bit different. The blue took quite a bit if mixing using 3 stains, oil paints and added blue pigment to get the blue my heart was set on. The White for the upper units was finished in a water based stain and poly shield so it didn’t yellow like varnish can do. Using a deep blue for the walls in this bright area really sets off the white upper cabinets.

We did not prefer the usual stone counters so we built a cherry counter on the north/sink side and an earthy tile on the stove side. I worked as a potter for years and I really like tile even if others don’t. We kept the light beige 12” tile floor because it was in great shape and we didn’t want to pull up more than the few feet we had to. Good thing since the floor under it has asbestos. We made the backsplash out of “handmade look” tan tile in a stair step design. The tiles were given to us and worked fine.
Ok....cabinet building time....lots of big wooden boxes that hopefully will fit as planned. When it came time to install them we learned that a laser level is invaluable. The house had settled 3/4” over 15’ sloping down hill. Not a big problem and not unexpected. Some bases had to be slightly shortened and some shimmed up but eventually they were all level. It was a Chinese puzzle with huge pieces moving them around. Many say this is the hardest part of putting in a kitchen and they are right!
Now we had the carcasses in place we thought we were almost done but, wrong! Building the doors and drawers took much longer than we expected but was more interesting. Time to order the Blum hinges and glides. The hardest part about getting old is learning new things and these German “over” engineered soft close units were a challenge in themselves. This hardware adds a nice level of quality but the installation took a while to learn and metric measuring. They worked great for the European uplift doors.
Next, we rout, finish and install the crown molding and “under cabinet light shade” molding....another job that took longer than expected. Finish carpentry is quite meticulous but, it’s almost done. We still need to cut the island so it’s 22” wide for more room, and paint the bottom red for more color. We need to build 6 leaded door inserts using glass in our colors in a prairie style but that can be in the heat of summer. At least we can use the kitchen now!
Here are some finished photos and cabinet inserts we enjoy. Some ideas I thought of ....and some I stole!
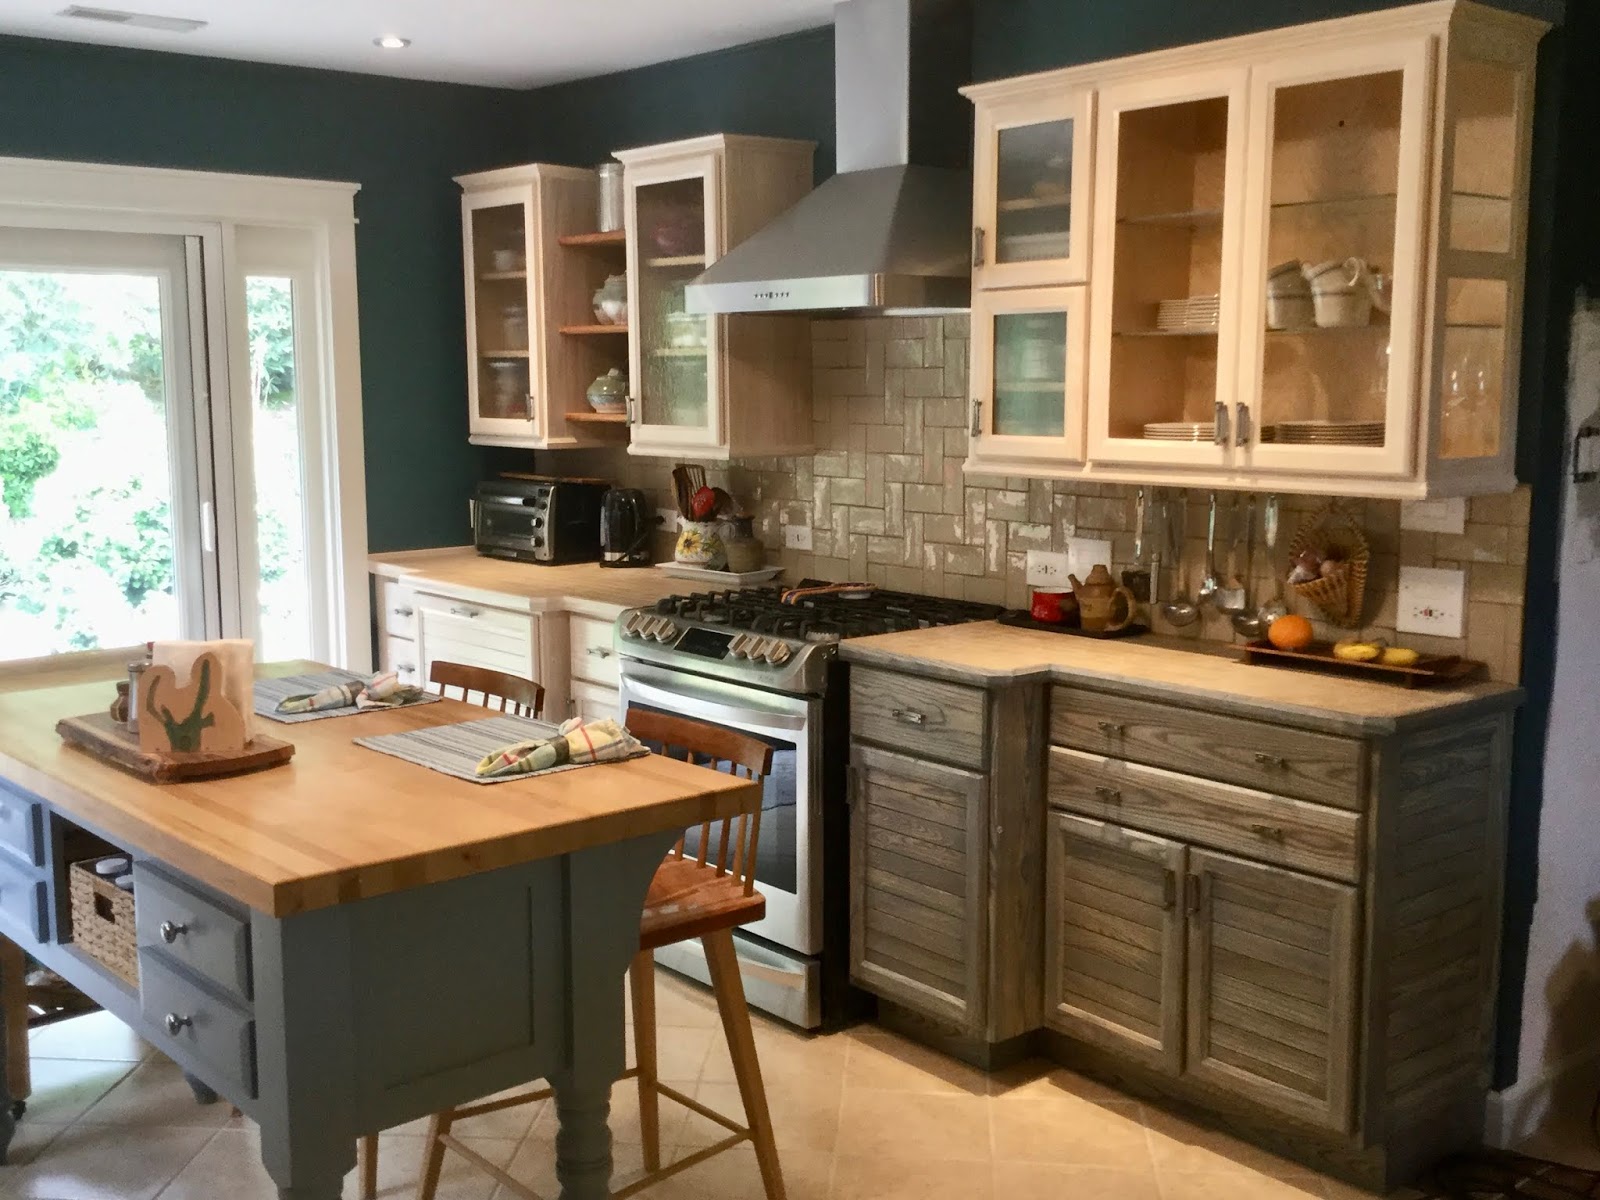
The stove/south side
Installing the powerful Zline vent fan was another challenge but it really draws.

The sink/north side with cherry countertop that is sealed with Waterlox
We had a local plumber remove the old kitchen plumbing and run new service to this area.
We got a Karran composite “quartz” sink in bisque that matches the backsplash, and a Delta touch sensitive faucet. Used the old dishwasher but got new LG fridge and gas range.

My favorite part is the “old kitchen cabinet inspired” prep area where the center is deeper for more room and the storage drawers are huge. I still have a few open shelves above to show off my pottery. I had entirely too many open shelves in the old kitchen. Too much cleaning! I even got all new canisters for staples.

Love these 2 deep, wide drawers for appliances and plastic ware.

My deep plastic ware drawer

Spices right at the stove

Area to the right of the sink

Coffee station

Appliance drawer

Narrow pan storage and sink clean up storage above

The trash drawer with a shelf for compost bucket. Love this one!

Narrow cabinet for step ladder....we aren’t tall!

China cabinet area to right of range, leaded inserts to be made for upper doors

Linens in shallow drawers

Knife storage in island

Pots in a shallow 18” deep area

Paper towels and kitchen linens

Love my roll outs with oils and flavorings just at the range.

So handy to have space for medicines and vitamins and our own individual pill drawers

I had my heart set on European lift doors

Bar area...excuse work tools!
Wine rack on side. Top unit to get leaded glass.

The booze drawer and top accessory drawer

The bar stools will be used with a breakfast bistro table in between the two rooms when we cut the top down. We will make shelves from the 9” cut off piece.

The fridge enclosure with uplift door and textured glass
So this is our big kitchen design and build.
It took 6 months and $16,000 for everything...supplies, doors, labor (other than ours), ash wood, plywood, new appliances, gas hook up, permit, handles, all hardware and even some new tools and attachments and it also includes the cypress deck. Chuck kept meticulous records.
Our labors were of some value in appreciating our home.
Mostly it was fun to develop a vision and work together to realize it.
Currently, we removed this wall to the dining room and are working on the drywall in the sitting room now and the deck is coming along when it isn’t raining.


Perhaps this will show the processes behind the project and help others beginning theirs.
N

Head woodworker, Installer, glazier, deck builder,
Attic and crawl space crawler
Chuck

Designer, electrician, painter, tiler, drywaller,
Alexis Lynn
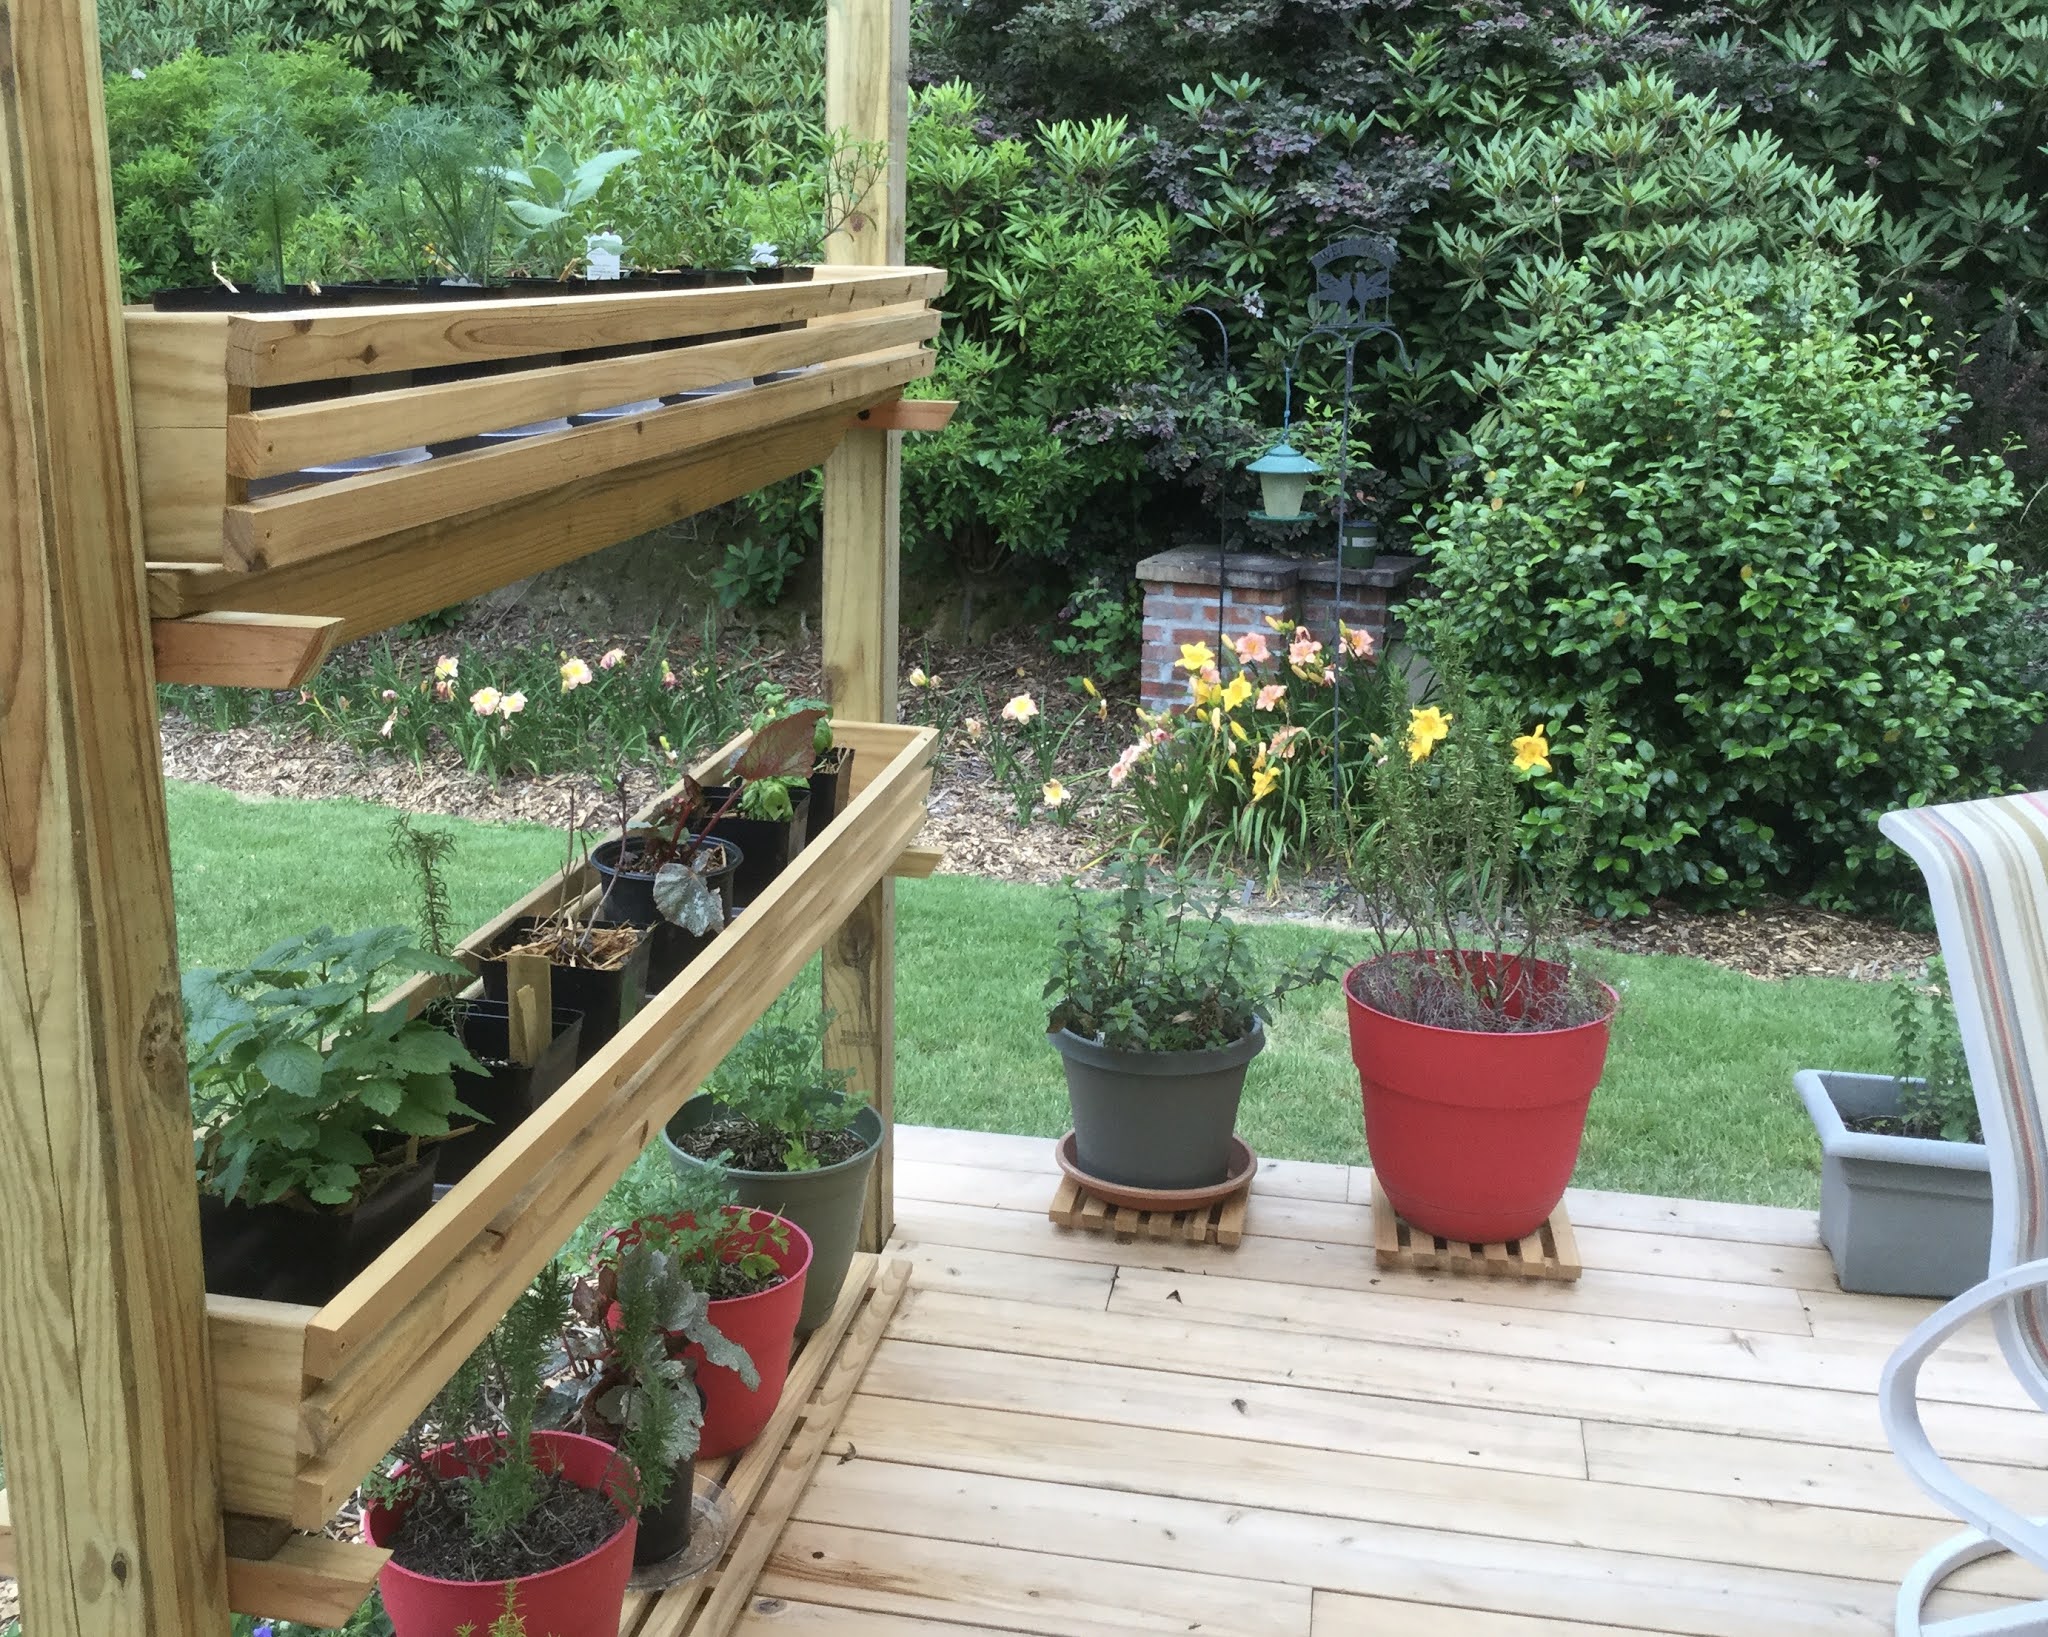
Here are photos of the finished deck


We finished the ambrosia maple bistro table


Here is the coffee station with decal

And the island got trimmed and painted to brighten all the blue
The wood slab is olive wood for use as a prep station

And we finished the dining room

Another update….here are the finished leaded windows in the China and bar cabinets


Now I think we are done with the whole project!
Thanks for visiting
OMG!!!!!!!! That is unreal!!! So beautiful, so professional, so gorgeous!!! I love the color, the cabinets, the countertop the design..omg!!! My heros!!!!
ReplyDeleteThis is so inspiring, i wish my hubby and i had the guts to try our hand at remodeling our kitchen, hope you enjoy it for a very long time together :)
ReplyDeletewhat a beautiful kitchen. You two are so talented!
ReplyDelete